

Ultimate Guide to the Axle Adjuster – No 3: Essential BMC Trackmachine 01 Spare Part for Peak Performance and Precision
If you own a BMC Trackmachine 01 or are passionate about high-performance track and fixed-gear cycling, the Axle Adjuster – No 3 is one of those critical yet often overlooked components that keeps your ride smooth, safe, and competitive. This official BMC spare part ensures precise rear wheel alignment, optimal chain tension, and reliable performance on the track or road. In this comprehensive, long-form guide, we’ll dive deep into everything you need to know about the Axle Adjuster – No 3 — from its role in your bike’s geometry to installation tips, maintenance advice, and why sticking with genuine BMC parts matters. Whether you’re a seasoned racer, a weekend warrior, or a mechanic looking for reliable info, this post will help you maximize your Trackmachine’s potential.

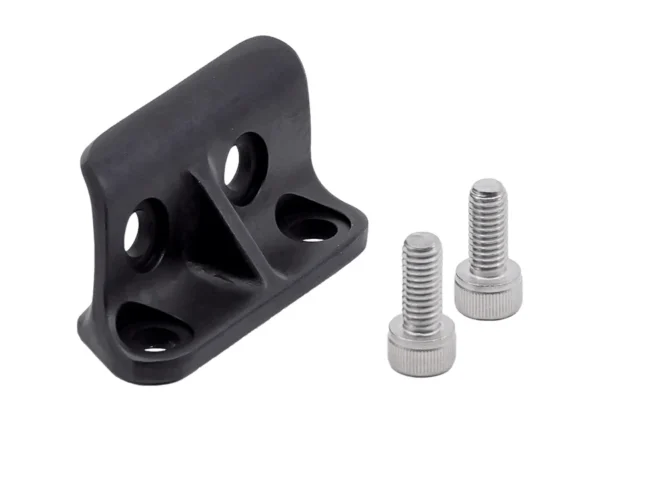
The Axle Adjuster – No 3 is a genuine BMC Switzerland spare part (SKU 219155) designed specifically for the Trackmachine 01 series. Priced affordably at around $25, this precision-engineered component fits into the horizontal dropout system of BMC’s flagship track bike. Unlike vertical dropouts found on many modern road bikes, horizontal dropouts require a dedicated adjuster to slide the rear axle forward or backward.
This allows riders to fine-tune chain tension without relying on a derailleur — essential for single-speed or fixed-gear setups common on track machines. The “No 3” designation refers to BMC’s part numbering system for compatibility across specific frame sizes and models in the Trackmachine lineup. It’s a small but vital piece: a threaded or cam-style adjuster that secures the rear axle while maintaining perfect wheel alignment.

Without a properly functioning Axle Adjuster – No 3, you risk chain slack, poor power transfer, or even safety issues like wheel slippage under hard acceleration. BMC engineers these parts to exact tolerances, ensuring they match the carbon fiber frame’s stiffness and the bike’s aggressive geometry.
The Trackmachine 01 is BMC’s premier track bike — a sleek, aerodynamic machine built for velodrome dominance and high-speed road use. Its frame features horizontal dropouts, a hallmark of pure track bikes that prioritizes lightweight design and direct power delivery. The Axle Adjuster – No 3 works in tandem with the dropout to let you dial in the perfect chain tension (typically ½ to 1 inch of play on the lower chain run for fixed-gear setups).
This adjuster isn’t just a bolt-on accessory — it’s engineered to handle the immense forces of sprinting, cornering, and repeated high-cadence efforts. BMC’s spare parts catalog lists multiple numbered axle adjusters (like No 1 or No 2 for other models), but the Axle Adjuster – No 3 is the exact match for the Trackmachine 01, guaranteeing seamless integration and longevity.

Investing in the genuine Axle Adjuster – No 3 delivers several performance and practical advantages:
Generic aftermarket adjusters might seem cheaper, but they often lack the precise threading or material quality of BMC’s design, leading to alignment issues or failure under stress. The official Axle Adjuster – No 3 is the smart choice for maintaining your bike’s factory performance and resale value.

How do you know it’s time to swap in a new Axle Adjuster – No 3? Watch for these common red flags:
Regular inspections after every few rides (especially in wet or dusty conditions) can catch issues early. If your Trackmachine 01 has seen heavy track time or long storage periods, proactive replacement of the Axle Adjuster – No 3 is a low-cost way to avoid bigger problems.

Installing the Axle Adjuster – No 3 is straightforward for anyone with basic bike tools. Here’s a clear, beginner-friendly walkthrough:
Pro tip: Always replace both left and right adjusters if one is worn, for balanced performance.


Proper care extends the life of your Axle Adjuster – No 3 dramatically:
Routine maintenance takes just minutes but saves hours of frustration (and money) down the road.
Even the best parts can encounter issues. If your Axle Adjuster – No 3 feels loose:
For alignment troubles, double-check your measurements and consider professional shop service for carbon frames. Always use genuine BMC parts to avoid voiding any remaining warranty coverage.
For peace of mind, purchase your Axle Adjuster – No 3 directly from authorized BMC dealers or the official BMC Switzerland website (us.bmc-switzerland.com or regional stores). It’s listed as in stock with fast shipping and full compatibility guarantees for the Trackmachine 01. Avoid unverified third-party sellers to ensure you get the real part with proper quality control.
The Axle Adjuster – No 3 may be a small spare part, but it plays an outsized role in the performance, safety, and enjoyment of your BMC Trackmachine 01. By understanding its function, following proper installation and maintenance, and choosing the official component, you’ll keep your bike running at its absolute best — whether you’re chasing podiums on the velodrome or enjoying spirited rides on open roads.
Don’t wait for problems to appear. Grab a spare Axle Adjuster – No 3 today and ride with confidence knowing every detail of your setup is optimized. If you have questions about compatibility or installation for your specific Trackmachine build, drop a comment below or reach out to your local BMC dealer. Happy riding, and may your chains stay perfectly tensioned!

Only logged in customers who have purchased this product may leave a review.

Reviews
There are no reviews yet.